Continuing my animation experiments from earlier, today I’m going to composite the first shot into the animated teaser, trying out different techniques and effects to achieve the best result possible with the somewhat limited quality of the Pika generation.
As a reminder – this is the scene I want to recreate:
And this is what I have currently:
Upscaling
To start off, Pika has reduced my already small resolution I got out of Midjourney from 1680 × 720 to a measely 1520 × 608, and it is quite blurry and still shows some flickering, though as per my previous post, this is probably as good as it gets.
I first tried upscaling the generated video using Topaz Video AI, a paid application, whose sibling for photography, Topaz Photo AI, has given me great results in the past. Let’s see how it handles AI generated anime:
The short answer is that it pretty much doesn’t. I tried multiple settings and algorithms but it seems like the Video AI simply does not add preserved detail to my footage. I suspect that the application is geared more towards real footage and struggles heavily with more stylised video.
Next, perhaps more obviously, I tried Pika’s built-in upscaler, which I have only heard bad things about:
Immediately, we see a much better result. Overall the contrast is still low and I’m not expecting an upscaler to remove any flickering, but there is a noticeable increase in detail, sharpening and defining outlines and pen strokes that the illustrated anime style relies upon heavily.
This is great but expensive news since the Pika subscription model is extremely expensive at 10$ per month for around 70 generated videos granted to the user per month. I’ll have to see what I can do about that, maybe there’s a hidden student discount.
After Effects
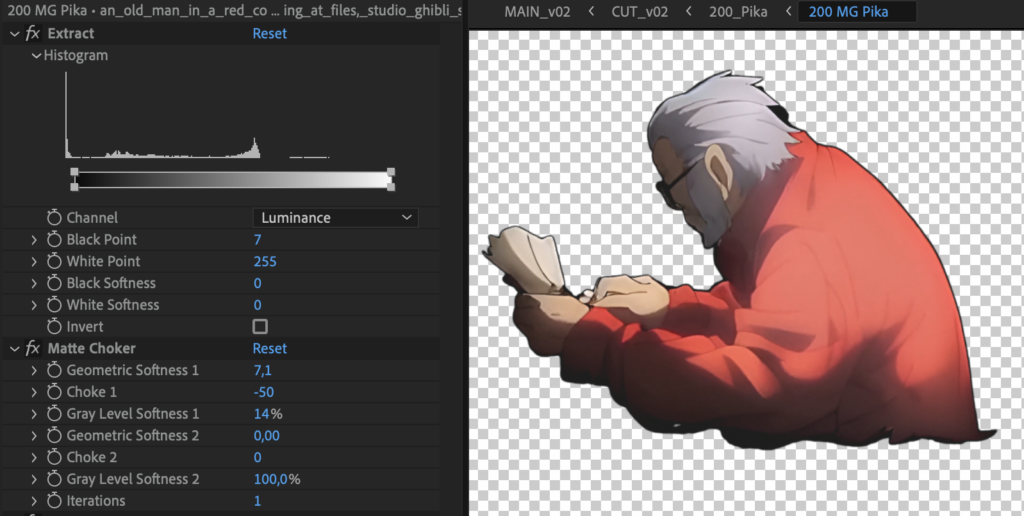
Finally, familiar territory. After having upscaled the footage somewhat nicely, I loaded it into after effects and started by playing around with getting a usable alpha. I found that a simple Extract to get the rough alpha followed by a Matte Choker to smooth things out and get a consistent outline worked pretty great, although not perfectly.

The imperfections become especially apparent when playing the animation back:
There are multiple frames where the alpha looks way too messy, the flickering is still a pain and the footage is still scaling strangely, thanks to Pika’s reluctancy to have at least a little bit of camera motion.
At this point I took away two main techniques that seem to have the best effect and should be very versatile in theory: Time Remapping and Hold Keyframes. I recall speaking to my supervisor of a potential way to have Midjourney create keyframes, then have the user space those out as needed and then have AI interpolate between them to create a traditional workflow, assisted by AI. But it seems that the AI works much better the other way around – by having it create an animation with a ton frames – many of which can will probably look terrible, and then hand-picking the best ones and simply hold-keyframing your way through.
Here’s what that looks like:
Immediately, a much more “natural” result that resembles the look of an actual animated anime way more. What’s even better is that this gives me back a lot of creative control that I give up during the animation process with Pika.
After some color corrections and grunging everything up, I’m pleased with the result. I think the dark setting also helps ground the figure into the background. Still, it’s not very clear exactly what the character is doing, so this is still something I will need to experiment with further using Pika. Then again, that is expensive experimenting but oh well.
Overall I think this test was very successful – the workflow in After Effects is a straight forward one and does not care in the slightest if the video comes from Pika or any other software, which I am still open-minded about, given Pika’s pricing.
My next challenge will be getting a consistent character out of Midjourney, but I’m confident there will be a solution for that.