“One Wire hackbrett” – 2nd Semester Pitch Detection

The development of accurate and reliable string tuners has been a subject of great interest and innovation in the field of music technology.

As a result, numerous projects and technologies have emerged, each aiming to provide precise pitch detection and tuning capabilities for stringed instruments. In this analysis, we compare two prominent projects in the field of pitch detection string tuners to identify the most effective approach for advancing my own project:

  •  “the Motorized Guitar Tuner[1];
  •  “the Cyther V3”[2].

By analyzing these two projects, I aimed to identify the strengths and weaknesses of each approach and determine the most effective way to proceed with our own pitch detection string tuner project. This analysis will consider factors such as accuracy, precision, responsiveness, hardware components, software algorithms, and potential areas for improvement. The goal is to leverage the insights gained from these existing projects to guide the development of our own innovative and highly precise pitch detection string tuner.

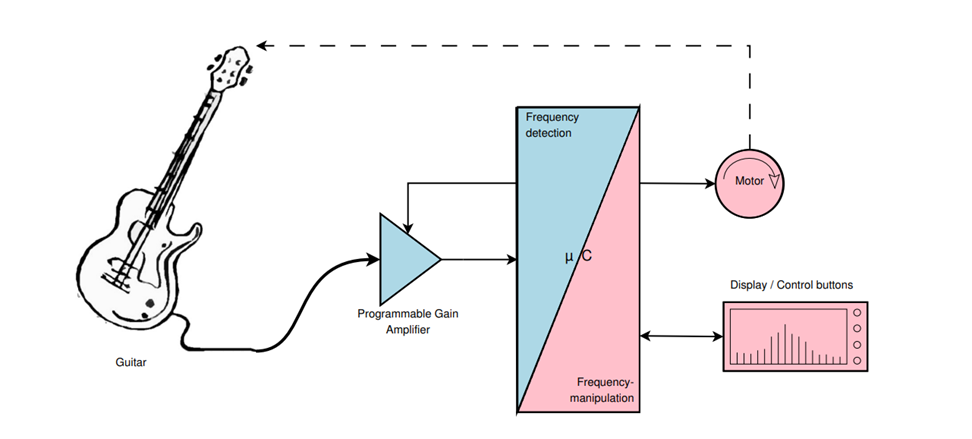
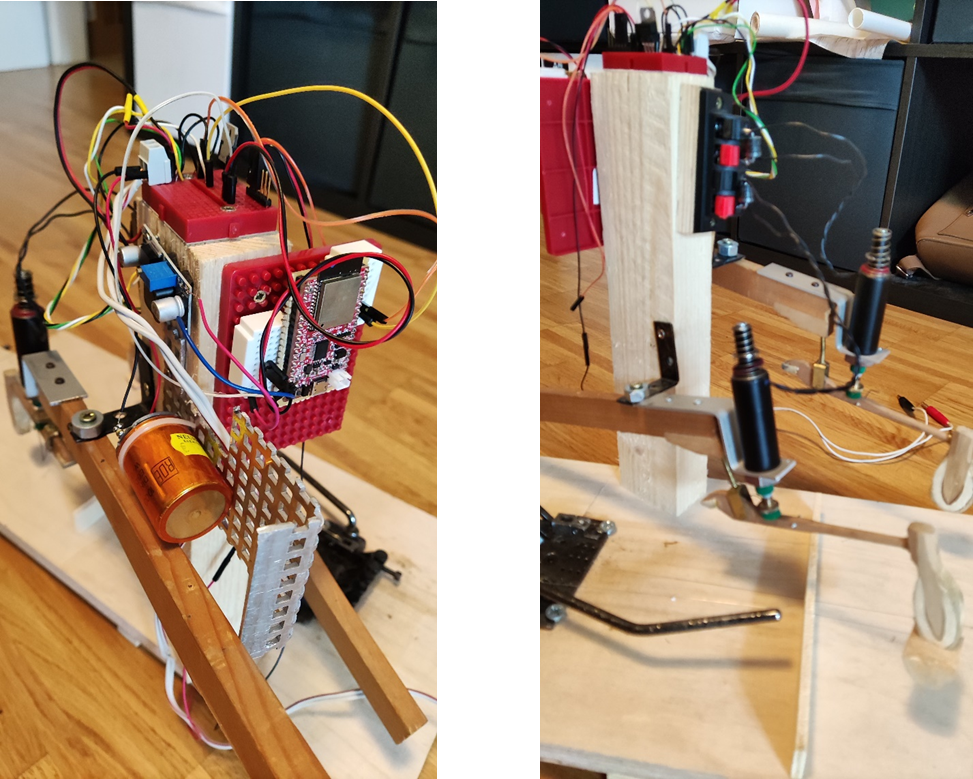
The Motorized Guitar Tuner (Fig. 6) is a hand-held device designed to automatically tune an electric guitar using a micro-controller and a servo motor. The device processes the guitar signal input precisely to provide high accuracy and implements an appropriate controlling algorithm for actuating the motor. The tuning results are quite good, but the accuracy is limited by the interaction of the different strings with each other and the guitar neck.  The document discusses various methods for detecting zero crossings and generating PWM signals for controlling a servo motor.  In the 2.2.4 chapter, the pure zero crossings method is discussed as a way to determine zero crossings without any previous calculations. However, this method was found to be unusable due to the presence of harmonic oscillations in the guitar string signal. On the other hand, the autocorrelation method was found to be more promising as it can point out periodic components very well, even in the presence of noise or distinctive harmonic oscillations. Therefore, the autocorrelation method was chosen as the preferred method for frequency detection.

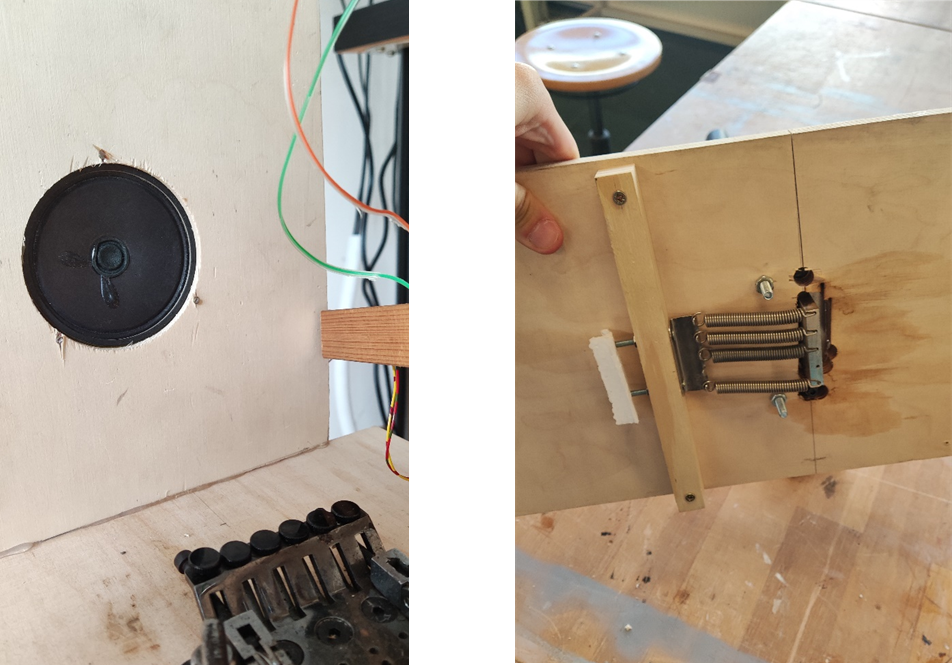
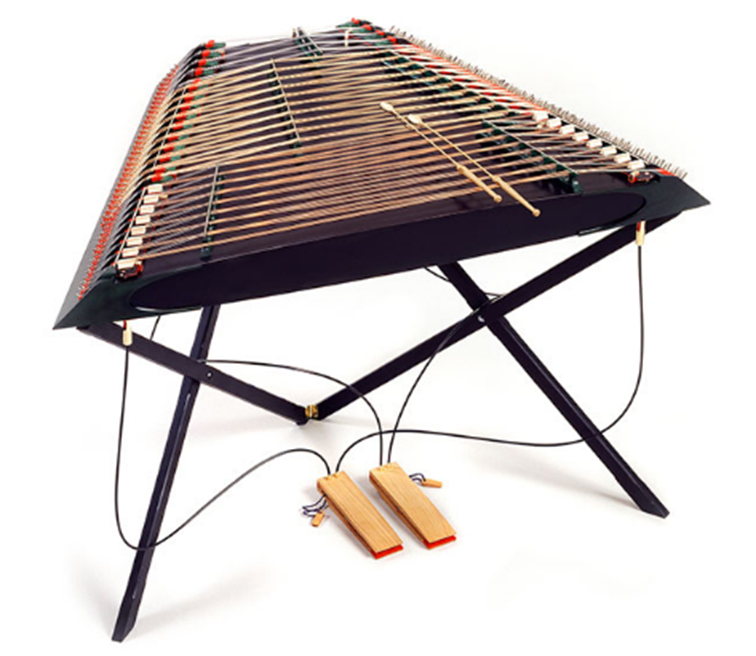
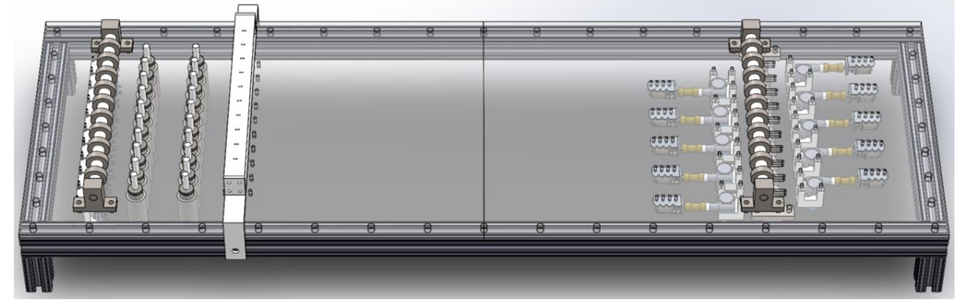
The second project create a mechatronic string instrument called “Cyther V3” (Fig. 7) that can autonomously tune each string during a performance. The tuning system senses string tension, estimates pitch, adjusts the tension, and corrects for errors in estimation using optical pickups. The tuning system was tested and found to be accurate within +/- 8 cents, but not precise enough for error to go undetected by human perception.

The tuning system is designed to sense the pitch of each string in a way that allows the instrument to create various pitch changing techniques like portamento and vibrato at all times during a performance. The system uses tension sensors to sense the tension in each string and estimate the pitch of the string. The actuators of this tuning system should be able to adjust the pitch of any string by a semitone in 100ms or less.

The software has a form of closed loop control to keep every string at a desired pitch. It should adjust the pitch estimation function over time to compensate for small changes to the instrument that alter the strings’ pitches.

The system uses optical pickups to measure the frequency of each string. The frequency information is used to update the curve that relates the frequency of the string to the tension sensor’s potentiometer value to prevent the error in the tuning system from compounding.


[1] TU Graz. Available at: https://www2.spsc.tugraz.at/www-archive/downloads/MGT_documentation.pdf (Accessed: 09 June 2023).

[2] Dynamically tuning string instrument – web.wpi.edu. Available at: https://web.wpi.edu/Pubs/E-project/Available/E-project-012317-195256/unrestricted/Dynamic_Tuning_MQP.pdf (Accessed: 09 June 2023).

“One Wire Hackbrett” – 2nd Semester Software

In my ongoing research on controlling solenoids, I have been exploring the use of PWM (Pulse Width Modulation) as a strategy to control these actuators. To enhance my understanding, I studied the work of Professor Winfried Ritsch, who has extensively researched this topic. Specifically, I found his “PWMEnvelope” [1] repository to be a valuable resource for experimenting with my instrument.

In this chapter of my research, I aim to summarize the key points that are essential for understanding and implementing Professor Ritsch’s code. By simplifying the concepts and principles, I hope to provide a clear overview of how the code functions and how it can be applied to my own project of controlling solenoids.

Envelopes are used to control PWM signals. In the attack phase, there is a fade to gradually reach the stroke level. After the stroke time, a sustain phase is applied to maintain the desired level, followed by a release phase to fade out the signal. By working with these parameters, we directly influence the timbral result. Like a piano key, by changing the level of pressure and duration of the attack we can achieve different sonic results. To ensure the safe operation of these devices, especially when using duty cycles lower than 100%, “PWM one-shot pulses” are utilized to prevent any potential issues.

Attack Stroke Hold Release for solenoids:

         _                      stroke level

       /   |_____          hold level

  _ /                 \_      off

  A   S   H        R      times  

To implement this functionality with the ESP platform, the LED-C Library[2] is used for generating the PWM signal, while the Timer library handles the one-shot timer feature.

The LED Control (LEDC) peripheral is a feature of ESP32 microcontrollers that is primarily used for controlling the intensity of LEDs. However, it can also be used to generate PWM signals for other purposes. The LEDC has 8 channels, each capable of generating independent waveforms. The LEDC channels usually have a 4-Channel high-speed mode and a 4-Channel low-speed mode, which provide different ranges of frequency for LED control.

The specific frequencies achievable in each mode may vary depending on the microcontroller or LED driver being used. These channels can be used to drive RGB LED devices, among other applications. The PWM controller of the LEDC allows for gradual increase or decrease of the duty cycle, enabling smooth fades without requiring processor intervention.

To set up a channel in the LEDC, three steps are involved:

  • Timer Configuration: Specify the PWM signal’s frequency and duty cycle resolution;
  • Channel Configuration: Associate the channel with the timer and GPIO pins to output the PWM signal;
  • Change PWM Signal: Modify the PWM signal to control the LED’s intensity.

The ESP32’s Timer Library[3] can be used to generate PWM signals by configuring it to repeatedly count up to a certain value and then reset. The ratio of the time it takes to count up to the reset value compared to the total period determines the duty cycle of the PWM signal. By adjusting the duty cycle, it can control the average power or intensity delivered to the device connected to the output pin.

When using multiple libraries or processes that rely on timers in the ESP32 microcontroller, it is advisable to allocate each process to a specific hardware timer or counter to avoid interference between the processes. By assigning dedicated timers to different processes, potential conflicts, such as conflicting interrupt handling or timing discrepancies, can be avoided. Moreover, assigning separate timers to different processes helps maintain the integrity of each process’s timing operations and provides precise timing control.


[1] Ritsch, W. IEM development area, Sign in · GitLab. Available at: https://git.iem.at/uC/pwmenvelope/-/tree/master/examples/playing (Accessed: 11 June 2023).

[2] Led control (LEDC) ESP. Available at: https://docs.espressif.com/projects/esp-idf/en/latest/esp32/api-reference/peripherals/ledc.html (Accessed: 11 June 2023).

[3] General purpose timer (no date) ESP. Available at: https://docs.espressif.com/projects/esp-idf/en/v4.3/esp32/api-reference/peripherals/timer.html (Accessed: 16 June 2023).

“One Wire Haclbrett – 2nd Semester Introduction

In this project, we explore the ongoing development of a project that began last semester, focusing on the creation of a musical instrument using microcontrollers and actuators. This semester, I have continued my research by building a prototype that demonstrates the basic functions to be implemented in the final product. Let’s take a journey through the design and realization phases, uncovering the steps that led me to choose the right materials and programming strategy for this project. Starting off, I conducted thorough research into musical instruments, their construction, and the mechanics behind their sound. With this insight, I moved into the design phase, blending creativity with practicality. I carefully considered the materials that would enhance the instrument’s expressiveness and capture its unique character. Through sketches and inspiration, I crafted a blueprint that aimed to create a captivating musical experience. However, design alone couldn’t bring the instrument to life; it required the combination of artistic and engineering skills. This led me to microcontrollers and actuators, which play a vital role in animating the instrument. The construction of the prototype marked a significant milestone. I brought my creative vision into tangible form. The prototype showcased the instrument’s essential features, demonstrating innovation and musical features. As the semester comes to an end, I am inspired by the melodies produced by the prototype, motivating me to refine every detail for the final product.

Below, the steps I had planned at the end of the first semester:

  1. Implement PlatformIO[1] to connect the Arduino´s codes together and have a better and more fluent programming environment;
  • create a GUI that communicates with the instrument via Wi-Fi. Through OSC messages, I will map the following parameters:
    • the time interval between the beats of the solenoid;
    • velocity;
    • the degrees of rotation of the lever to vary the pitch;
    • the degrees of rotation of the tuning screws;
  • build two wooden sticks to support two hammers for each string.
  • change the tuning system of the “Hackbrett”, similar to a guitar´s one, to decrease the required torsion force for the DC motor to rotate them;
  • create different supports that fits the servos in order to change the tuning of the strings;
  • regarding the performative aspect of this instrument, I will implement one IR sensor to control the lever. I will map the movement of the hand to the steps of the motor to change the pitch through movement.
  • implement a small DC motor to control a sort of mute rail of the piano, damping the strings.

[1] PlatformIO Platformio is a professional collaborative platform for embedded development, PlatformIO. Available at: https://platformio.org/ (Accessed: January 26, 2023).

“One Wire Hackbrett” – 2nd Semester Construction

In order to effectively showcase the individual components that would eventually comprise the final instrument, I took the initiative to create a rudimentary version resembling a Hackbrett, utilizing a wooden board and a Floyd Rose tremolo system. This makeshift instrument boasted the inclusion of two strings and a mobile bridge, enabling the manipulation of string pitch without the need for mechanical screws.

To emulate the motion of drumsticks required to play the instrument, I employed two piano hammers (Fig. 2) upon which I strategically positioned the two solenoids. These solenoids were connected to the structure through the help of a wooden stick, which also served as a housing for all the necessary electronic components (Fig. 1), ensuring a compact and conveniently transportable design. The resultant outcome was an instrument that facilitated effortless customization, thanks of its adaptable elements capable of being repositioned in space, thereby opening up a realm of diverse tonal possibilities to be explored.

The decision to use wood as the primary material for the instrument was driven by its acoustic characteristics. Even without the presence of a resonance chamber, wooden material offered a sound quality that closely resembled the desired outcome of the final product.

To capture the sound produced by the strings, I opted for an electric piezo system. This allowed for the isolation of the direct string sound from the mechanical sound generated by the solenoids. By employing this setup, I could accurately capture the nuances of the instrument’s natural vibrations while maintaining control over the mechanical elements. To amplify it, I mounted a speaker on a wooden plate that should has work as resonator. The entire amplification id driven by a D-Class amplifier PAM480[1], attached with the speaker directly on the body of the instrument (Fig. 3).

By fixing the Floyd Rose lever (Fig. 4) in conjunction with the stepper motor, I devised a solution using two small wooden pieces that served as a guide for the lever. This setup ensured that the lever remained stable and fixed during the tensioning process.  Strategically positioning the stepper motor directly at the tip of the lever was a deliberate choice aimed at maximizing the advantage of leverage. By identifying the optimal leverage point, I could effectively exert tension on the strings with minimal effort from the stepper motor.

Regarding the use of the Servo motor, the idea is to simulate a feature of the final instrument that will be applied during the next semester, i.e. a mute that can attenuate the strings. As can be seen in Fig. 5, the pedals are connected by a string to a wooden rod and felt, which acts as a mute if necessary.


[1] GmbH, B. 73 A. (no date) Startseite, Startseite • FUNKAMATEUR OnlineShop. Available at: https://www.box73.de/product_info.php?products_id=4391 (Accessed: 15 June 2023).

Impulse 4: Stranger Things

Craig Henighan is a sound designer for the science fiction TV series “Stranger Things,” which is considered a masterpiece when it comes to sound design. There is much to discuss regarding the entire sound design and production. I will touch on only a few points that I found impressive.

Main themes:
Starting with the opening, composed by Kyle Dixon and Michael Stein capture the vibes of ’80s horror movies. The main theme was created using the Roland Juno 6, known for its excellent built-in arpeggiator, while other themes were produced with the Sequential Circuits Prophet 5, one of the first synthesizers to introduce presets, designed by Dave Smith.

Haunting clock:
In Season 4, a haunting grandfather clock becomes a signature sound effect connected to the Vecna’s character. Henighan creatively manipulated it by layering multiple clock ticks, experimenting with cello strings for a groan-like effect, and adding a slowed-down, descending tone for the final chime, amplifying its eerie presence in the world of the story.

Vecna
For the monster (Vecna) sound the sound designer heavily compressed the audio and boosted the low-end EQ, then applied the Infected Mushroom plug-in Manipulator for pitch shifting. Reverb and delay effects were added before Mark Patterson, the dialogue and music mixer editor, applied his own processing and dynamically panned Vecna’s voice for spatial depth.

References:
1. https://www.asoundeffect.com/stranger-things-sound/
2. https://www.goldderby.com/feature/craig-henighan-stranger-things-sound-design-video-interview-1205030685/
3. https://www.youtube.com/watch?v=QjOYXpoxHCg&ab_channel=Avid

Impulse 3: Cello 2 Cello

Centrum Nauki Kopernik (Copernicus Science Centre) in Warsaw, Poland provides various exhibitions/performances/concerts for educational and entertaining purposes. The place is quite unique when it comes to acoustics. The spaces are designed flexible to accommodate diverse events. This includes implementing noise and reverberation control measures, integrating audiovisual systems.

At the beginning of January I was invited to the concert of “Cello 2 cello” band, consisting of two cellists: Izabela Buchowska and Agnieszka Kowalczyk. Their music blends classical, folk, and contemporary styles. They perform in Poland and worldwide. I found the concert very entertaining. The repertoire was not appealing to my personal musical taste, but I liked the creative and technically level of performance. The repertoire mostly covered popular songs like ABBA, Libertango by Piazzola, Lady Gaga, and Game of Thrones. Of course, one of the biggest advantages was the acoustics of the hall. Every note sounded clear and rich, filling the space beautifully. The sound was warm, making the music feel immersive.

Another event that made a great impression on me in this hall was a concert under the stars and a journey inside the moon. During the entire concert, you could lay on pillows and watch the cosmos accompanied by ambient music. It was one of the most beautiful concerts I got to experienced.

References:
1. https://www.kopernik.org.pl/en/node/2737
2. https://www.rmfclassic.pl/polecamy/Muzyka,4/Klasyka-i-jazz-pod-gwiazdami-w-planetarium-Centrum-Nauki-Kopernik,30161.html
3. https://www.mamodalekojeszcze.pl/centrum-nauki-kopernik/

Blog Post 10 – Pika into After Effects

Continuing my animation experiments from earlier, today I’m going to composite the first shot into the animated teaser, trying out different techniques and effects to achieve the best result possible with the somewhat limited quality of the Pika generation.

As a reminder – this is the scene I want to recreate:

And this is what I have currently:

Upscaling

To start off, Pika has reduced my already small resolution I got out of Midjourney from 1680 × 720 to a measely 1520 × 608, and it is quite blurry and still shows some flickering, though as per my previous post, this is probably as good as it gets.

I first tried upscaling the generated video using Topaz Video AI, a paid application, whose sibling for photography, Topaz Photo AI, has given me great results in the past. Let’s see how it handles AI generated anime:

The short answer is that it pretty much doesn’t. I tried multiple settings and algorithms but it seems like the Video AI simply does not add preserved detail to my footage. I suspect that the application is geared more towards real footage and struggles heavily with more stylised video.

Next, perhaps more obviously, I tried Pika’s built-in upscaler, which I have only heard bad things about:

Immediately, we see a much better result. Overall the contrast is still low and I’m not expecting an upscaler to remove any flickering, but there is a noticeable increase in detail, sharpening and defining outlines and pen strokes that the illustrated anime style relies upon heavily.

This is great but expensive news since the Pika subscription model is extremely expensive at 10$ per month for around 70 generated videos granted to the user per month. I’ll have to see what I can do about that, maybe there’s a hidden student discount.

After Effects

Finally, familiar territory. After having upscaled the footage somewhat nicely, I loaded it into after effects and started by playing around with getting a usable alpha. I found that a simple Extract to get the rough alpha followed by a Matte Choker to smooth things out and get a consistent outline worked pretty great, although not perfectly.

The imperfections become especially apparent when playing the animation back:

There are multiple frames where the alpha looks way too messy, the flickering is still a pain and the footage is still scaling strangely, thanks to Pika’s reluctancy to have at least a little bit of camera motion.

At this point I took away two main techniques that seem to have the best effect and should be very versatile in theory: Time Remapping and Hold Keyframes. I recall speaking to my supervisor of a potential way to have Midjourney create keyframes, then have the user space those out as needed and then have AI interpolate between them to create a traditional workflow, assisted by AI. But it seems that the AI works much better the other way around – by having it create an animation with a ton frames – many of which can will probably look terrible, and then hand-picking the best ones and simply hold-keyframing your way through.

Here’s what that looks like:

Immediately, a much more “natural” result that resembles the look of an actual animated anime way more. What’s even better is that this gives me back a lot of creative control that I give up during the animation process with Pika.

After some color corrections and grunging everything up, I’m pleased with the result. I think the dark setting also helps ground the figure into the background. Still, it’s not very clear exactly what the character is doing, so this is still something I will need to experiment with further using Pika. Then again, that is expensive experimenting but oh well.

Overall I think this test was very successful – the workflow in After Effects is a straight forward one and does not care in the slightest if the video comes from Pika or any other software, which I am still open-minded about, given Pika’s pricing.

My next challenge will be getting a consistent character out of Midjourney, but I’m confident there will be a solution for that.

₁₅ Towards the Masters Thesis

Since dealing with blog posts and the master thesis preparation course has been far and inbetween this post is meant more for myself to get me a little further back on track and to collect my thoughts and findings up until now.

Preliminary title: “Effects of virtual reality training environments for large scale emergency operations in comparison to real life training”

Here the exposé I created for class:

Although to me it did feel like I narrowed down my scope quite a bit during the creation of my exposé, I realise that it is still very broad and my topic will need to be defined more clearly until I can send the topic assignment / approval form. I know which general direction I am taking, though I am lacking in understanding of what actually constitutes a masters thesis and how deep I can and should go, and consequently how much I am able to cover.

Next Steps:

1. Search through current literature and find what the latest status on research in my relevant area is and organise my findings in a sorted collection for later use.

I have already set up something like my own personal blog and resource collection space in form of a Notion page, which I plan on using as a guide throughout the process. I hope that I will be able to expand on it and properly organise everything to speed up my workflow. On this page I will collect thoughts, links, images, contacts and whatever else I might need.

2. Engage in conversation with other professionals from my field who deal with the topic or something similar on a daily basis.

I do already have a few connections from previous projects at work in mind, which I will contact in order to find out more about the topic but also gain new perspectives and maybe input on different aspects I can cover in my thesis.

3. Contact research partners and institutions to interview them about the topic.

As an extension of the previous points I will, once I have a better idea of what exactly I will be tackling, interviewing research partners and asking for permission to reference their work during my own.

4. Find possible cooperation partners for projects through step 3.

If the opportunity arises during step 3, I could possibly find a project which I can analyse and work towards during and for my thesis specifically.

5. Define a temporary structure of my work.

Self explanatory, once all the previous steps are done I would like to come back to my Notion and organise everything into a preliminary structure for me to follow.

6. Define a timeline based on all my collected information.

Once that structure is defined I will lay out more concrete plans on how to move forward from that point.

Interesting literature:

Here are some sources I found that I will further investigate for a solid foundation.

https://ieeexplore-1ieee-1org-18gcrmwtl00a2.perm.fh-joanneum.at/xpl/conhome/1000791/all-proceedings

https://ieeexplore-1ieee-1org-18gcrmwtl00a2.perm.fh-joanneum.at/document/10108413

https://www.sciencedirect.com/science/article/pii/S096599781300166X

https://www.sciencedirect.com/science/article/pii/S0379711212000136

https://link.springer.com/article/10.1007/s00530-023-01102-0

₁₄ Data Concerns with VR

As is the case with all new technology, it is easy to lose oneself in the excitement of the most recent developments and fascination of the possibilities when looking at VR/AR. However, it is important to also address parts that might prove to have a negative impact, be it in terms of emotional and physiological responses, environmental concerns, data safety or something else.

So, for this blog post, I decided to look into safety concerns that come with the usage of VR hard- and software and possible dangers connected to it, as a fitting wrap-up to my previous ventures.

Since it is a relatively new sector, augmented reality is rather vulnerable to cyber attacks like spoofing, data manipulation or snooping.1

VR-headsets are basically variations of a computer, and VR-experiences are essentially software applications, which means that a VR system is just as susceptible to issues of cyber criminality as phones or computers. A VR headset could be just as easily falling victim to a cyber attack as every other computer, possibly resulting in data breaches that can leak personal information, lead to identity theft or cause damage to the hard- and software, amongst other things. One fact that stood out to me in particular was how severely personal information might be endangered when we are talking about virtual reality: VR-systems need to track the user’s movements in order to even work properly. What most people don’t know, however, is the fact that a person’s movement is just as individual as their fingerprints, thus possibly enabling companies to always identify a person based on their movement data and without their consent.2

Due to a person’s unique movement pattern, it is almost impossible to anonymize VR- and AR-tracking data. Scientists already managed to identify users very precisely, which would be a real issue if a VR-system were to be hacked.3

VR-applications collect a lot more data than conventional technologies, as they can listen to all of the users conversation via the live mic, collect biometric data and even record eye-tracking data, thus determining what the user might look at.4

So, one of the most imminent dangers of using augmented reality technologies is the fact that the applications and hardware collect a lot of information about who the user is and what they are doing. With this, questions such as „what do AR-companies use the acquired user data for“ or „Does the company share the data with third parties“ arise.3

Generally, when big brands offer certain technologies, the public has a much higher level of trust for these applications or devices without really addressing concerns about them or questioning the product. Over-trusting is a real issue, as it is important for users and designers of VR-products to concern themselves with topics like the previously mentioned dangers of hacking, impact of user age on their experience, or the response of a user to unexpected issues such as hurting oneself while using a VR-appliance.5

Sources

1. Thetechrobot. “What are the Security and Privacy Risks of VR and AR” medium.com. Published September 21, 2023. https://medium.com/@thetechrobot609/what-are-the-security-and-privacy-risks-of-vr-and-ar-264896d290f3

2. IEEE. “Virtual Reality Security” IEEE Digital Reality. 2022. https://digitalreality.ieee.org/publications/virtual-reality-security

3. Kaspersky. “VR und AR: Risiken für die Sicherheit und Privatsphäre” Kaspersky. n.d. https://www.kaspersky.de/resource-center/threats/security-and-privacy-risks-of-ar-and-vr

4. Awais, Maham. “What are the potential risks of virtual reality?” Educative.io. n.d. https://www.educative.io/answers/what-are-the-potential-risks-of-virtual-reality

5. Kenwright, Ben. “Virtual Reality: Ethical Challenges and Dangers. Physiological and Social Impacts” IEEE Technology and Society Magazine, vol. 37, no. 4, p. 20-25, Dec. 2018, doi: 10.1109/MTS.2018.2876104.

Impulse 8 – Storytelling inputs

I’ve been pretty focussed on the production side of things for my master’s project, which I can’t really blame myself for, given that I’m a media design student. But regardless of how I will animate my project or what if it is going to be a music video, short film or something else, it will need a story.

Now obviously the ChatGPT generated movie trailers were quite cheesy and a bit unoriginal. But they did follow a story structure that we provided, for me that was Dan Harmon’s story circle. When the trailer came together, it was clear to me that this style of story wasn’t going to work, but I didn’t really know why, it just felt wrong.

This is why I want to do some more research in the field of storytelling, specifically highlighting differences between western and eastern storytelling and in doing so, understanding more about the easter practices, and applying those to my film.

Structure

The aforementioned story circle by Dan Harmon of course isn’t the only western structure for storytelling, there’s also Blake Snyder’s Beat Sheet, Freytag’s pyramid or even Shakespeare’s 5 act structure. Originating in China and eventually making its way over to Korea and Japan, eastern storytelling often follows the ‘Kishotenketsu’ structure:

  • Ki (introduction)
    • Characters are intruduced
    • Establishing the setting
  • Sho (development)
    • Adding context
    • Increasing complexity
  • Ten (twist)
    • Introducing a surprising turn or revelation
  • Ketsu (conclusion)
    • Resolving the story harmoneously

You’ll notice that none of the parts involve conflict, a quality most western stories rely on heavily. Kishotenketsu instead emphasises gradual unfolding and the beauty of unexpected connections, providing a unique narrative experience characterised by a balanced and contemplative progression. While conflict can definitely be a part of the stores told, they seldom serve as a structural component.

Characters

Characters in the west usually have a certain flaw that they have to overcome on their journey to beat some antagonist. That character then embarks on a journey that changes their beliefs. In eastern stories the journey tests the beliefs that the character already holds. This tends to lead to less or flatter character development, which can be uncanny for western audiences. In general, changes are less drastic and more nuanced in eastern storytelling.

Antagonists are also treated differently. They are rarely “defeated” in the way we understand it in the west, which seems like a byproduct of the decreased importance of conflict.

World building

Whatever story is going to be told, it will need a setting and a world. I want to briefly talk about the differences in hard versus soft storytelling, a distinction that isn’t specific to eastern storytelling, but I do have some important points to make about the latter.

Hard

Hard world building involves a highly detailed and structured storytelling approach, where the world follows precise logic, rulesets and sometimes even politics, geography and history. This approach aims to immerse the audience by creating a believable world, one in which all rules and consequences make sense and every last detail about it and the story can be explained in some way.

Soft

Soft world building on the other hand is much more nuanced and plays with the viewer’s own imagination. Little is told about the world and its rulesets, giving small hints along the way to pique the viewer’s interests, making them wonder about what else there is to know. This style works very well in fantastic settings, where whimsical and unfamiliar worlds are explored, and the viewer’s wonder and lack of understanding drives their immersion.

Soft world building emphasises nuances, feelings, and imaginative involvement and therefore leaves more room for the viewer’s imagination while providing the author with more creative freedom. Not everything needs an explanation, and some authors even choose to defy logic in their soft world building approach.

Another advantage of soft world building is that the introductory phases of a story can be much shorter and focus on what’s essential – the characters, the mood and the essential lore of the world. For these reasons I want to aim at a soft world building approach and try to create a character driven story in a world that plays with the viewers imagination, while providing enough information to understand any essential rules of the world if needed.

Thoughts

This impulse was a challenging, since I feel like storytelling is one of my weakest skills and certainly one which I have the least experience with. But it was still kind of fun because I was watching well-made videos. Unfortunately, I don’t think YouTube counts as reliable literature for a Master’s thesis so I’m dreading having to look up literature about all of this. But maybe this is just my modern way of researching – diving into a topic in a familiar way and then choosing what I find interesting and looking up more reliable literature for it. I think it could work.

Something I will need to look into more regarding the production of the film is the issue of character continuity using Midjourney. This was already an issue during the production of my anime movie trailer, but will now get even worse, given that I believe that character driven storytelling is the way to go for my project.

Links:

https://www.youtube.com/watch?v=Kluj70TBrJg

https://tenkensmile.blogspot.com/2017/04/spirited-away-lost-in-translation.html

https://medium.com/@IgnacioWrites/comparing-every-form-of-story-structure-f98e3d5f7e2c

https://www.youtube.com/watch?v=gcyrrTud3x4

https://www.youtube.com/watch?v=1zi7jIZkS68